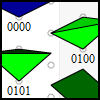
Alright, giving the landscape some natural feeling by applying colors to the tiles. This simply fits into the dynamic drawing of tiles by using a fill. The shading here will be done with static colors instead of shadow calculation.
The result will look like this:
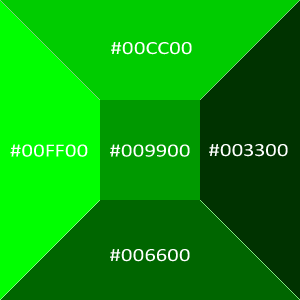
First things first. When it comes to choosing a color palette that fits the needs of our application. The most simple thing I could think of here was shades of green with blue for the zero level (aka water). The surface of planet could be red, a desert maybe yellow and white could be used for the inside of a refridgerator (could be an interesting game).

The shading main palette for the tiles
The next thing I did was to set a tile type. That way I was able to use switch...case (more on that here). The next code is based on Appendix A. There, right after the makeTiles function I inserted the following.
function recalcTiles()
{
	for each ( var tile in tileArray )
	{
		tile.low = tile.n.w;
		tile.e.w < tile.n.w ? tile.low = tile.e.w : void;
		tile.s.w < tile.e.w ? tile.low = tile.s.w : void;
		tile.w.w < tile.s.w ? tile.low = tile.w.w : void;

		tile.n.i = tile.n.w - tile.low;
		tile.e.i = tile.e.w - tile.low;
		tile.s.i = tile.s.w - tile.low;
		tile.w.i = tile.w.w - tile.low;

		tile.tType:String = tile.n.i.toString()+tile.e.i.toString()+tile.s.i.toString()+tile.w.i.toString();
	}
}
The lowest height value (sic!) is found by comparing all four corner nodes. Each node then gets assigned a value i determining his difference from the lowest. Those values are hopefully between 1 and 0. A string is created in clockwise order.
Remember that drawTile function? That's the subject of change now.
function drawTiles()
{

	var tileMapSizeH = ( nodeCols - 1 + nodeRows - 1 ) * tileSizeH;
	var tileMapSizeV = ( nodeRows - 1 + nodeCols - 1 ) * tileSizeV;
	tileMap.x = stage.stageWidth * 0.5;
	tileMap.y = stage.stageHeight * 0.5 - tileMapSizeV * 0.5;
	tileMap.graphics.lineStyle(1, 0x000000);

	for each ( var tile in tileArray )
	{
		if ( tile.valid )
		{
			var tileText = new TextField();
			tileText.text = String(""+tile.n.w+tile.e.w+tile.s.w+tile.w.w);
			tileText.autoSize = TextFieldAutoSize.CENTER;
			tileText.x = tile.s.xPos + tileMap.x - tileText.width/2;
			tileText.y = tile.s.yPos + tileMap.y;
			addChild(tileText);

			tile.n.zPos == tile.s.zPos ? tile.ver = true : tile.ver = false;
			tile.e.zPos == tile.w.zPos ? tile.hor = true : tile.hor = false;

			drawFour(tile);
		}
	}
	addChild(tileMap);
}
Besides the text field (just information) the whole drawing code is in an external function.
function drawFour(tile)
{
	with ( tileMap.graphics )
	{
		switch(tile.tType)
		{
			case "0000":
				//flat
				moveTo(tile.n.xPos, tile.n.yPos - tile.n.zPos);
				if ( tile.lev == 0 )
				{
					beginFill(0x000099);
				}
				else
				{
					beginFill(0x009900);
				}
				lineTo(tile.e.xPos, tile.e.yPos - tile.e.zPos);
				lineTo(tile.s.xPos, tile.s.yPos - tile.s.zPos);
				lineTo(tile.w.xPos, tile.w.yPos - tile.w.zPos);
				lineTo(tile.n.xPos, tile.n.yPos - tile.n.zPos);
				endFill();
				break;
			case "0001":
				//north
				moveTo(tile.n.xPos, tile.n.yPos - tile.n.zPos);
				beginFill(0x003300);
				lineTo(tile.e.xPos, tile.e.yPos - tile.e.zPos);
				lineTo(tile.w.xPos, tile.w.yPos - tile.w.zPos);
				lineTo(tile.n.xPos, tile.n.yPos - tile.n.zPos);
				endFill();
				//south
				moveTo(tile.e.xPos, tile.e.yPos - tile.e.zPos);
				beginFill(0x006600);
				lineTo(tile.s.xPos, tile.s.yPos - tile.s.zPos);
				lineTo(tile.w.xPos, tile.w.yPos - tile.w.zPos);
				lineTo(tile.e.xPos, tile.e.yPos - tile.e.zPos);
				endFill();
				break;
			case "0010":
				//east
				moveTo(tile.n.xPos, tile.n.yPos - tile.n.zPos);
				beginFill(0x003300);
				lineTo(tile.e.xPos, tile.e.yPos - tile.e.zPos);
				lineTo(tile.s.xPos, tile.s.yPos - tile.s.zPos);
				lineTo(tile.n.xPos, tile.n.yPos - tile.n.zPos);
				endFill();
				//west
				moveTo(tile.n.xPos, tile.n.yPos - tile.n.zPos);
				beginFill(0x00CC00);
				lineTo(tile.s.xPos, tile.s.yPos - tile.s.zPos);
				lineTo(tile.w.xPos, tile.w.yPos - tile.w.zPos);
				lineTo(tile.n.xPos, tile.n.yPos - tile.n.zPos);
				endFill();
				break;
//and so on
Okay, so I had a look at every tile (like they used to look in Appendix A) and determined the direction of its parts. Then, with a look at the chosen color palette and beginFill and endFill I brought them to life. There is a case setting for each of the 16 tiles. To be honest there are only 15, because both flat tiles are in the same case, and their color just depends on their level. Seeing that concept I am sure you can figure out the rest of that function above on yourself.
After applying that the showroom will look like that.
EDIT: Here's the Source (zip).
Yoho!
More articles in Terrain Modification:
- Terrain Modification in Grid Based Games - Part 1: Isometric Landscape
- Terrain Modification in Grid Based Games - Appendix A: Dynamic Tiles
- Terrain Modification in Grid Based Games – Part 2: Moving Nodes
- Terrain Modification in Grid Based Games – Part 3: Active Landscaping
- Terrain Modification in Grid Based Games – Appendix B: Shading
- Terrain Modification in Grid Based Games – Appendix C: Shading and Bitmaps
- Terrain Modification in Grid Based Games - Exercise A: Minimap and Comets

 TripleDrop
 TriPop
 PaperWolf: Training


5 Responses to Terrain Modification in Grid Based Games – Appendix B: Shading